Prerequisites
Ports required:
9015,
9020
Table of Contents
Tor, also known as “The Onion Router”, is the most popular “anonymizing network” or “darknet”. It works by relaying your internet traffic through various servers (ran by volunteers) and encrypting the traffic with new keys for every “hop”, thus creating various layers of encryption just like an onion.
This tutorial will cover 4 ways of running Tor on the server: (Note: all of these may be run simultaneously if you wish!)
-
Running a “Hidden Service”, a website accessible through the Tor network that anonymizes both the server and the client.
-
Running a “Middle Node”, one of the “hops” from the user’s connection to their final destination (likely an exit node).
-
Running a “Bridge”, which you can use from your client device to connect to Tor for the first “hop” of the connection.
-
Running an “Exit Node”, a public gateway to the “clearnet” for Tor users. This is what lets Tor access “normal” websites.
WARNING: Running a Tor exit node opens up your internet connection to the entire Tor user-base to use as they please. This will likely lead to increased attention to your home! There have previously been phone calls and home visits by ISPs due to suspicious activity from Tor exit nodes. Only run a Tor exit node if you are 100% sure your ISP or VPS provider doesn’t mind the traffic.
Installation
Begin by setting up the Tor repositories:
apt install -y apt-transport-https gpg
echo "deb [signed-by=/usr/share/keyrings/deb.torproject.org-keyring.gpg] https://deb.torproject.org/torproject.org $(lsb_release -cs) main
deb-src [signed-by=/usr/share/keyrings/deb.torproject.org-keyring.gpg] https://deb.torproject.org/torproject.org $(lsb_release -cs) main" > /etc/apt/sources.list.d/tor.list
Then download and import the Tor Project’s GPG key:
wget -qO- https://deb.torproject.org/torproject.org/A3C4F0F979CAA22CDBA8F512EE8CBC9E886DDD89.asc | gpg --dearmor | tee /usr/share/keyrings/deb.torproject.org-keyring.gpg >/dev/null
Finally, update the repositories and install Tor and the relevant key.
apt update
apt install tor deb.torproject.org-keyring
Hidden Services
Tor can proxy any TCP-based traffic you wish to give it. This includes webservers, Monero nodes, and even XMPP chat. This guide will use an NGINX website as an example, especially to highlight the special features one can use in NGINX to enhance the Tor experience.
Configuring Tor
Begin by editing the main Tor configuration file, /etc/torrc:
HiddenServiceDir /var/lib/tor/example.org/
## The first "80" is the port that will be used on Tor (the web port)
## The second "80" (after 127.0.0.1) is the local, NGINX port to query
HiddenServicePort 80 127.0.0.1:80
Note the directory, /var/lib/tor/example.org/. This is where Tor will generate the public and secret keys to your website. These are the keys that give your site its unique address.
Optional: Generating a Vanity Address
If you run Tor with the configuration above, it will generate a random secret key (hs_ed25519_secret_key) with a matching address made up of 56 characters.
You may choose to pre-generate a secret key for your website by using brute-force computation. This results in what’s known as a “vanity” address, such as in the following example:
alexkblxod5eo6d6rcpauirzbticc2fjzorun5bqyixmg23mk6b27byd.onion
To accomplish this, a program named mkp224o can be installed.
Begin by installing the build dependencies:
apt install gcc libc6-dev libsodium-dev make autoconf
Then clone the repository and enter it:
git clone https://github.com/cathugger/mkp224o
cd mkp224o
Run the following to configure and build:
./autogen.sh
./configure

make -j$(nproc)
Finally, run the program with a desired string filter:
# Change the 1 to a different number if you want more addresses
./mkp224o -n 1 alex
Please note: The more characters you add to your filter, the longer the program will take to generate the address! Running it with
alexmay only take a few seconds, but running it withalexandermay take weeks!
The program will finally output the resulting address when it’s finished:
alexkblxod5eo6d6rcpauirzbticc2fjzorun5bqyixmg23mk6b27byd.onion
waiting for threads to finish... done.
By default, the program will output the secret and public keys in a directory of the same name as the address it just generated. Copy over the keys to your HiddenServiceDir to start using your vanity address:
cp *.onion/* /var/lib/tor/example.org/
NGINX Configuration
To allow NGINX to properly serve the website to Tor, create a new configuration file in /etc/nginx/sites-available/tor_hidden_service and add the following content:
server {
    listen 127.0.0.1:80;
    root /var/www/example.org;
    index index.html;

    server_name alexkblxod5eo6d6rcpauirzbticc2fjzorun5bqyixmg23mk6b27byd.onion;

    location / {
        try_files $uri.html $uri $uri/ =404;
        if ($request_uri ~ ^/(.*)\.html(\?|$)) {
            return 302 /$1;
        }
    }

}
Make sure to link the configuration file from /etc/nginx/sites-available to /etc/nginx/sites-enabled:
ln -s /etc/nginx/sites-available/tor_hidden_service /etc/nginx/sites-enabled/
Optional: Tor Header on your Clearnet Site
If you run a website both on the clearnet and on Tor, you may choose to advertise this by configuring a custom header in NGINX. When accessing the clearnet example.org, Tor browser users may be shown a redirect notification informing them of your website’s hidden service:

To configure this, edit your normal clearnet NGINX configuration file (example: /etc/nginx/sites-available/example.org/) and add the following line with your hidden service’s address:
server {
...
    add_header Onion-Location http://alexkblxod5eo6d6rcpauirzbticc2fjzorun5bqyixmg23mk6b27byd.onion$request_uri;
...
}
Running the Hidden Services
You can now run the hidden service by starting and enabling the Tor daemon:
systemctl start tor
systemctl enable tor
To access your new hidden service, use the Tor browser or any other browser connected through Tor, and enter your service’s address:

Middle/Guard Node
To setup a middle node, add the following to /etc/tor/torrc:
Nickname    myNiceRelay  # Change "myNiceRelay" to something you like
ContactInfo alex@example.org  # Write your e-mail and be aware it will be published
ORPort      9015   # Pick any port you wish, but avoid 9001 as it is commonly flagged as Tor
ExitRelay   0 # This is NOT an exit node, hence why this is 0
SocksPort   0 # Set this to 0 if you don't want to use this tor daemon to connect clients from your network
Now simply restart the Tor daemon to start your middle node and contribute to the network:
systemctl restart tor
Bridge Node
Begin by installing the obfuscation proxy program, obfs4proxy:
apt install obfs4proxy
Configure the program in /etc/tor/torrc:
ServerTransportPlugin obfs4 exec /usr/bin/obfs4proxy
Then add the following configuration to /etc/tor/torrc:
## This may be duplicate information from the middle/guard bridge configuration
Nickname    myKindBridge
ContactInfo alex@example.org
ORPort      9015 # Pick any port you wish, but avoid 9001 as it is commonly flagged as Tor

## Enabling the obfs4 bridge itself
BridgeRelay 1
ServerTransportListenAddr obfs4 0.0.0.0:9020
ExtORPort auto ## This is an alternative to the line above, setting an automatic port
Obtaining the Bridge Line
The bridge’s connection template, including certificate information, is located at /var/lib/tor/pt_state/obfs4_bridgeline.txt:
cat /var/lib/tor/pt_state/obfs4_bridgeline.txt
This will output the following:
Bridge obfs4 <IP ADDRESS>:<PORT> <FINGERPRINT> cert=OeGVmoMzOvI5QyYNyotNZUvWkEirSfMoL0U51BxpgyZwpnpfFYhpovYnTmaWh3oq7c/m2o iat-mode=0
Replace the <IP ADDRESS> and <PORT> information with your server’s public IP and the obfs port (9020) respectively.
The <FINGERPRINT> can be found in /var/lib/tor/fingerprint:
cat /var/lib/tor/fingerprint
This will output:
myKindBridge LCJCJDTPPLPPWMCNNKLEMSGETQLSCMDWSYGTKLFL
The final bridge string will look like this:
Bridge obfs4 121.32.16.102:9020 LCJCJDTPPLPPWMCNNKLEMSGETQLSCMDWSYGTKLFL cert=OeGVmoMzOvI5QyYNyotNZUvWkEirSfMoL0U51BxpgyZwpnpfFYhpovYnTmaWh3oq7c/m2o iat-mode=0
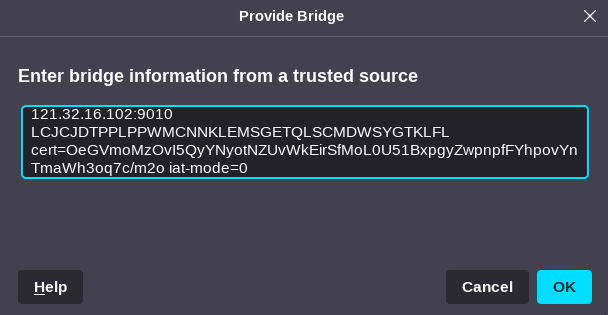
You may now utilize this in Tor browser. Begin by going to Settings –> Connection, scrolling down to bridges and selecting “Add a Bridge Manually”:

This will open a window where you can paste the bridge information. Do NOT paste in the initial Bridge obfs4 section of the string.
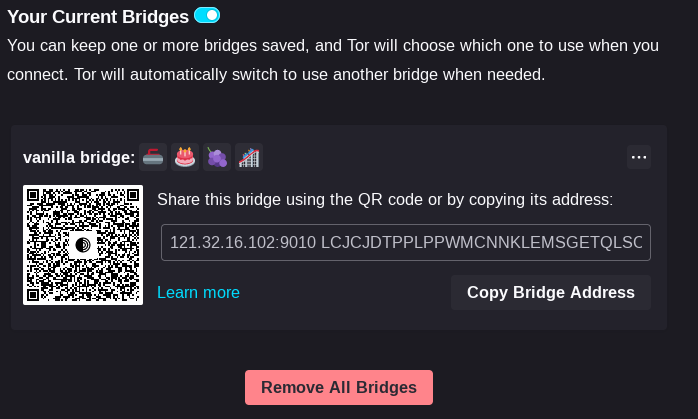
Finally, the bridge will show up in your list of bridges, including a handy QR code to share it and the corresponding “bridgemoji” for error checking. The Tor browser will automatically use it to connect through the next time you start it:
Exit Node
As mentioned at the beginning of this article, running an exit node can be dangerous. Take all the necessary precautions to inform your ISP about this before enabling this option. Do this at your own risk.
To set up an exit node, simply set up a Middle/Guard Node and set the ExitRelay option to 1:
ORPort 9015
ExitRelay 1
Simply restart the Tor daemon for changes to take effect:
systemctl restart Tor
Congratulations! You’ve successfully set up Tor.